A window that fogs between the panes, sticks halfway, or lets a draft cut across the room in January is usually telling you its useful life is over. Swapping it out is one of the bigger jobs a homeowner can take on without a contractor, and on a sound opening it is genuinely a one-afternoon project. The part people skip is figuring out which kind of replacement they are actually doing before they pry anything loose.
This guide covers how to tell it is time, how to measure so the new unit fits, the difference between an insert and a full-frame job, and the eight steps to set, shim, and seal the window. If you would rather hand the whole thing off, our window installation team works across the Columbus and Cincinnati metros, but everything a confident DIYer needs is below.
Quick answer: To replace a window, measure the opening at three points, remove the old stops and sashes, then clean and inspect the rough opening. Dry-fit the new unit, shim it level, plumb, and square, fasten it, seal the gaps with low-expansion foam, and finish with caulk and trim. Most ground-floor windows take two to four hours.
Signs It Is Time to Replace a Window
Most windows do not fail all at once. They give you warnings for a year or two first, and reading them correctly saves you from replacing a unit that only needs a repair, or from nursing one that is already done. The clearest sign is moisture or a hazy film trapped between the panes of a double-pane window, which means the seal has failed and the insulating gas has leaked out. That haze will not wipe away, and a fogged unit has lost much of its insulating value.
Drafts you can feel with your hand, a window that will not stay open or sticks in its track, and a frame that feels soft or spongy when you press it are the other big tells. Rising heating bills through a Columbus winter often trace back to a few tired windows leaking conditioned air. If the glass has fogged but the frame and sash are still solid, you may only need an insulated glass replacement rather than a whole new window, so check the frame before you commit to the larger job.
Single-pane windows in a climate with real winters are worth replacing on energy grounds alone. They sweat with condensation, ice up at the edges, and do little to slow heat loss. If you are weighing a few repairs against a full swap, count how many of these signs a window shows at once; three or more usually points to replacement.
Insert vs Full-Frame Replacement

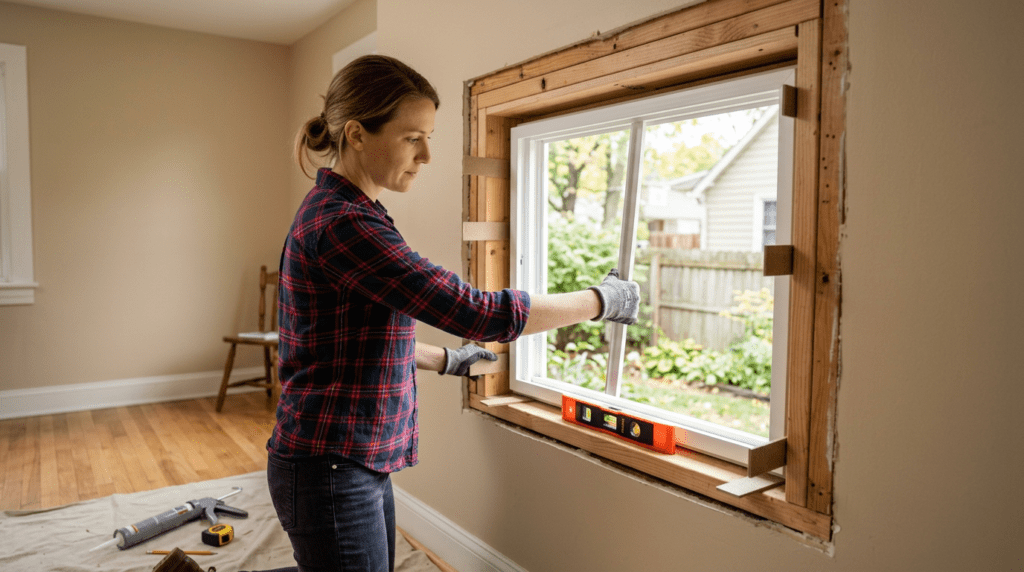
This is the decision that shapes the entire job, and most guides gloss over it. An insert replacement, sometimes called a pocket window, drops a new self-contained unit into the existing frame after you remove the old sashes and stops. The exterior trim, the casing, and the frame all stay put. It is faster, cleaner, and the realistic DIY path, because you are not opening up the wall.
A full-frame replacement strips everything back to the rough opening in the wall studs, including the frame and sill, and rebuilds from there. You do this when the existing frame is rotted, racked out of square, or when you are changing the window size or style. It involves flashing the opening, fitting a nail-fin window, and redoing the interior and exterior trim, which is real carpentry and where many DIYers should stop and call a pro.
For an insert to work, the existing frame has to be square and solid, so inspect it honestly before you order. The steps in this guide assume the common case: an insert into a sound double-hung or slider opening. Casement and awning windows crank on a hinge instead of sliding, so their hardware differs, and a double-hung window is the most forgiving style to start with if this is your first replacement.
Tools and Materials You Will Need
None of this kit is exotic, and you likely own most of it. The job lives or dies on two things: an accurate measurement and a window that ends up level, plumb, and square, so a good tape measure and a long level matter more than anything powered. Buy the new unit only after you have measured, not before, and have a helper on hand for lifting it into place.
Gather everything before you pull the old window, because once the opening is bare you do not want to leave it gaping while you hunt for a missing tube of caulk. Here is the short list.
- Tape measure and a 2-foot level for sizing the opening and setting the new unit straight.
- Pry bar, utility knife, and a putty knife to free the stops and break old paint or caulk seams.
- Drill and the screws supplied with the window for fastening through the jambs.
- Composite or tapered shims to plumb and square the frame.
- Low-expansion foam, exterior silicone caulk, and flashing tape for the air and water seal.
- Shop vacuum, safety glasses, and gloves for cleanup and protection.
How to Measure for a Replacement Window
A wrong measurement is the single most expensive mistake in this project, because a window ordered too large will not fit and a window ordered too small leaves gaps you can never seal properly. Measure the width in three places, at the top, middle, and bottom of the opening, and the height in three places, at the left, center, and right. Openings are rarely perfectly square, so you use the smallest of the three readings for each dimension.
Measure the depth too, from the inside edge to the outside stop, since most insert units need a jamb depth of around three and a quarter inches to sit correctly. Round each measurement down to the nearest eighth of an inch rather than up. To confirm how square the opening is, measure both diagonals from corner to corner; if they differ by more than a quarter inch, the opening is racked and you will be shimming to compensate.
Measure every opening on its own, even windows that look identical in the same room. On the older housing stock around Columbus, two windows framed side by side in 1925 can easily differ by half an inch after a century of settling. Write each opening’s numbers down and label them by room and location so the order is right the first time.
How to Replace a Window, Step by Step
With an accurate measurement and the new unit on hand, the install itself is methodical rather than hard. Work on a dry, mild day if you can, since an open wall and uncured sealant both prefer moderate weather over a January cold snap. Lay a drop cloth, keep your shims and screws within reach, and do not rush the leveling step, because everything downstream depends on it.
The order below is what keeps the job clean: clear the old unit, prep and protect the opening, then set and seal the new window. Take the diagonal measurement again after the window is in but before you drive every screw, because that is your last chance to correct a racked frame.
- Measure the opening. Take width and height at three points each plus the depth, and use the smallest reading.
- Remove the stops and sashes. Score the paint, pry off the interior stops, then take out the lower sash, the parting bead, and the upper sash.
- Clean and inspect the opening. Vacuum debris, scrape old caulk, and check the sill and jambs for rot before anything new goes in.
- Add flashing or a sill pan. Lay flashing tape or a sloped sill pan so any water that gets past the frame drains back outside.
- Dry-fit and set the window. Test-fit the unit, then run a bead of caulk on the exterior stop and press the window into place.
- Shim, level, and square it. Slide shims behind the jambs until it reads level, plumb, and square, with the diagonals matching within a quarter inch.
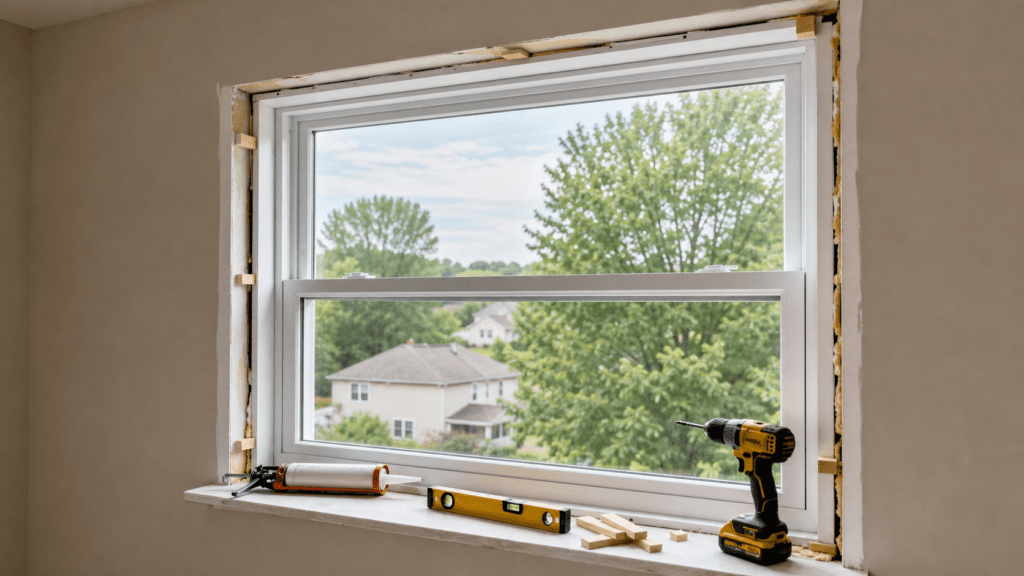
- Fasten and air-seal. Drive the mounting screws through the jambs at the shim points, then fill the gaps with low-expansion foam.
- Caulk, trim, and finish. Trim the cured foam, reinstall the stops and trim, caulk the exterior, and paint to match.
Sealing and Insulating for an Ohio Winter
The gap between the new frame and the rough opening is where a replacement window quietly wins or loses on comfort and energy. Fill it with low-expansion, window-and-door rated foam, never the standard high-expansion kind. The difference matters: a foam that keeps growing after it is in the gap will bow the jambs inward, and a bowed jamb means a sash that binds and a window you have to fight every time you open it.
Apply the foam in a thin pass and let it expand on its own rather than packing the gap full. Around the sill, the flashing or sill pan you laid earlier is what protects the wall through Ohio’s freeze-thaw cycles, when water that sneaks past the trim can freeze, expand, and force its way deeper. A sloped pan sends that water back out instead of letting it pool against the framing.
On replacements around Columbus, the callbacks we see months later are almost never the glass. They are over-foamed jambs that bowed and started sticking, or a skipped sill pan that let meltwater work into the wall. Slow, thin foam and a real pan under the sill prevent both.
Avoid stuffing the gap with loose fiberglass batt as your only seal; it does little to stop air movement and it soaks up any moisture that reaches it. Foam for the air seal, a sill pan for water, and a clean bead of exterior caulk over the joint is the combination that holds up.
Replacing Windows in an Older Columbus Home

Pre-war and mid-century homes around central Ohio bring complications a new build does not. Many original openings are out of square after decades of settling, so the diagonal check becomes essential and you should expect to shim more on one side than the other. Trust the level over the look of the trim, because the trim itself may have been hung crooked to match a sagging frame.
Older double-hung windows often hide a weight-and-pulley system inside the side jambs, with iron sash weights on cords running over pulleys. When you switch to an insert unit those pockets are left empty, and stuffing them with insulation closes off a hidden air path that would otherwise leak heat all winter. It is a small step that makes a noticeable comfort difference in a drafty old house.
One safety note that is not optional: homes built before 1978 may have lead paint on the old sashes and stops. Disturbing it during removal releases dust, so follow lead-safe practices, contain the debris, and if the paint is flaking heavily it is worth bringing in a certified pro rather than sanding it yourself.
Mistakes That Ruin a DIY Replacement
Most failed DIY window jobs trace back to a handful of avoidable errors, and every one of them shows up later as a draft, a leak, or a sash that will not glide. Read this list before you order anything, because the costliest mistakes happen before a tool is ever picked up.
None of these take extra skill to avoid. They take patience and the willingness to measure twice.
- Measuring the old window instead of the opening, which gives you a unit that is the wrong size from the start.
- Assuming windows in the same room match, when settling can leave them a half inch apart.
- Skipping the diagonal square check, so the window goes in racked and never seals or operates right.
- Over-foaming the gap, which bows the jambs and makes the sash stick.
- Forgetting the sill pan or flashing, the step that keeps Ohio meltwater out of the wall.
- Installing over hidden rot, instead of fixing the soft framing first.
When to Call a Pro Instead
An insert into a sound, square ground-floor opening is fair game for a careful DIYer. Several situations are not, and recognizing them ahead of time saves you from a half-finished job and an open wall. Full-frame replacement is the clearest line: once you are flashing a bare opening and setting a nail-fin window, you are doing weatherproofing carpentry where a small mistake leaks for years.
Rot is the other one. If you find soft, punky wood in the sill or jambs when you pull the old unit, the framing has to be repaired before any window goes back in, and that work is easy to underestimate. Upper-floor and large windows add a fall risk and an awkward lift that really wants two trained people and the right staging.
Egress windows in bedrooms and basements also carry code requirements for minimum opening size, and getting those wrong has safety and resale consequences. If any of this describes your project, or you simply want the install warrantied, it is reasonable to bring in a crew. Our team handles the measuring, the out-of-square openings, and the sealing as a matter of routine.
Want It Measured and Installed Right?
If your opening is out of square, you found rot behind the trim, or the window is upstairs and heavy, there is no prize for forcing a DIY install that leaks or binds. A correct measurement and a properly sealed unit are what make a replacement window pay you back in comfort and lower bills.
Book a free, no-pressure window assessment with our Columbus and Cincinnati team, and get a straight answer on whether your project is a simple insert or a job worth handing off.
FAQ: Replacing a Window

Ready to fix your windows? Get a free quote in 30 seconds.
Family-owned, licensed & insured. Most quotes delivered the same day.