
A storm door is one of the few upgrades that pays you back in the same season: it cuts drafts, protects your entry door from weather, and lets you screen the breeze in spring. It is also one of the most DIY-friendly jobs around the house, since most modern doors ship pre-hung in a frame with a drilling template. You do not need to be a carpenter, just careful and patient.
This guide covers the whole install, from measuring and hanging the door to fitting the hardware and sealing it up, plus the mistakes that make a door drag or leak. If your old storm door is the real problem, our overview of door types and repair covers the repair-versus-replace question.
Quick answer: To install a storm door, measure the opening, attach the drip cap, mount the hinge-side rail plumb, then hang the door with a helper. Set the latch-side rail with an even gap, add the closer and bottom sweep, and test the swing until it seals without dragging. Most installs take two to four hours.
Before You Start: Tools, Types, and a Reality Check

Most storm-door installs take two to four hours for a first-timer, and almost all of that time is measuring, leveling, and adjusting rather than driving screws. The job goes faster and straighter with a second set of hands, because a storm door is light but awkward to hold square while you fasten it. If you can, line up a helper for the hanging step.
You will not need anything exotic. The basic kit is:
- Cordless drill and a small set of bits.
- Tape measure and a level for a square fit.
- Hacksaw or tin snips to trim the rails and sweep.
- Pencil and exterior caulk for marking and sealing.
The door itself ships with its own screws, hinges, drip cap, and a paper drilling template, so check the box before you start. It also helps to know the style you are working with: full-view doors carry one large glass panel, ventilating models swap glass for a screen seasonally, and retractable-screen doors hide the screen in the frame. The type changes the look, not the mounting steps below.
One reality check before you buy: the opening has to be square and solid. If the existing entry-door frame is rotted or out of square, fix that first. Ohio winters and wind are hard on storm doors, and a unit mounted to a weak frame works loose fast once the weather starts pushing on it.
How to Measure for a Storm Door
Accurate measurements decide whether the door drops in cleanly or fights you the whole way. Measure the width of the door opening at the top, middle, and bottom, and use the smallest of the three numbers, since frames are rarely perfectly parallel. Then measure the height on both the left and right sides and, again, work from the smaller figure.
Storm doors are sold to fit common openings, typically 32, 34, and 36 inches wide, and the frame includes adjustable rails to take up small gaps. If your measurement lands between sizes, size down and let the rails close the difference rather than forcing a wider door into a tight space.
Finally, decide the hinge side before you order or open the box. Most storm doors are reversible, but setting the handing up front saves you from reworking the hardware later. As a rule, hinge the storm door on the same side as your entry door so the two swing together and the handles do not collide.
How to Install a Storm Door, Step by Step
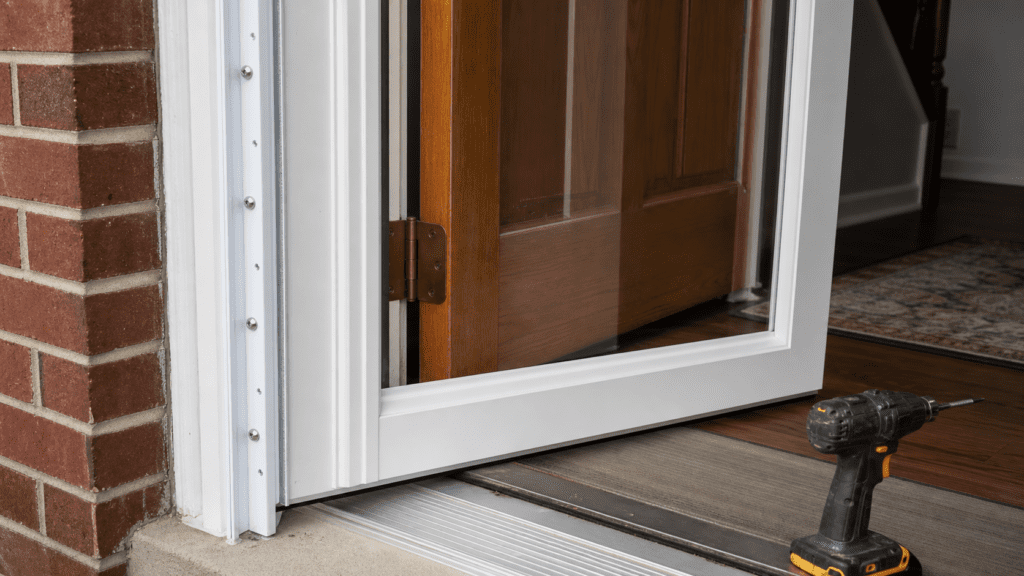
With the opening measured and the door unpacked, the install follows the same sequence on nearly every brand. Read the manufacturer’s sheet for the exact screw locations, but the order below is universal. Work top to bottom and check level at every stage rather than at the end.
Keep the drilling template the manufacturer provides taped in place until a step is finished. It positions the holes for you and is the single biggest reason these doors go in straight for first-timers.
- Dry-fit and measure. Hold the door in the opening to confirm the fit and hinge side, and recheck the width before drilling.
- Attach the drip cap. Fasten the drip (rain) cap along the top of the frame so water sheds over the door instead of behind it.
- Mount the hinge-side rail. Screw the hinge-side rail to the frame, checking it for plumb with a level so the door hangs square.
- Hang the door. With a helper, lift the door, align the hinges, fasten them, then swing it once to check clearance.
- Set the latch-side rail. Position the latch-side rail with an even gap along the door edge, level it, and screw it home.
- Install the closer and sweep. Mount the closer so the door shuts gently, then attach the bottom sweep to seal the threshold.
- Test and adjust. Open, close, and latch several times, fine-tuning the closer and sweep until it seals without dragging.
Installing the Latch, Handle, and Closer
The hardware is where a smooth install can still go wrong, so slow down for this part. Snap the supplied drilling template onto the latch edge and mark the holes exactly where it shows, because drilling freehand is the most common way to end up with a handle that sits crooked. Bore the holes, slide the latch body in, and fasten it before you add the face plates.
With the latch seated, push the handle rod through and secure the inside and outside handles, then test that the thumb latch catches the strike cleanly. If it misses, the strike plate on the frame usually needs to shift a hair up or down, which is a two-screw adjustment rather than a redo.
The closer is the last piece and the one homeowners skip adjusting. Mount the bracket and arm per the sheet, then turn the tension screw so the door pulls shut on its own without slamming. A second closer near the bottom, if your door includes one, keeps a tall door from twisting in the wind.
Sealing the Door: Sweep, Drip Cap, and Weatherstripping
A storm door only earns its keep if it actually seals, and three small parts do that work. The drip cap you set at the top sheds rain over the unit, the foam or vinyl weatherstripping in the rails closes the side gaps, and the bottom sweep blocks the draft at the threshold. Skip any one of them and you will feel it on a windy night.
The sweep is the piece most likely to need trimming. Set its height so it kisses the threshold and wipes it clean as the door closes, but does not drag hard enough to scrape or stick. If the sweep is too low the door binds, and too high lets cold air slip underneath.
Run a thin bead of exterior caulk along the top and sides where the frame meets the trim once everything is fastened, leaving the bottom open so any water that gets in can drain back out. That last detail keeps moisture from collecting behind the rails, which is exactly where hidden rot tends to start.
Common Storm Door Installation Mistakes
Most callbacks on a fresh storm door trace to a handful of avoidable errors, and every one of them shows up later as a door that drags, leaks, or rattles. Run through this list before you call the job done, because fixing them now takes minutes and fixing them after the trim is caulked takes a lot longer.
None of these are about strength or skill. They are about patience with the level and the template.
- Mounting the hinge rail out of plumb. A rail that is even slightly off makes the door swing open or shut on its own.
- Skipping the drip cap. Without it, rain runs behind the door and into the frame.
- Drilling the handle freehand. Always use the template, because a crooked latch never seats right.
- Over-tightening the closer. A slammed-shut door stresses the hinges and the glass.
- Caulking the bottom shut. Leave the base open so trapped water can escape.
When to Repair or Call a Pro Instead
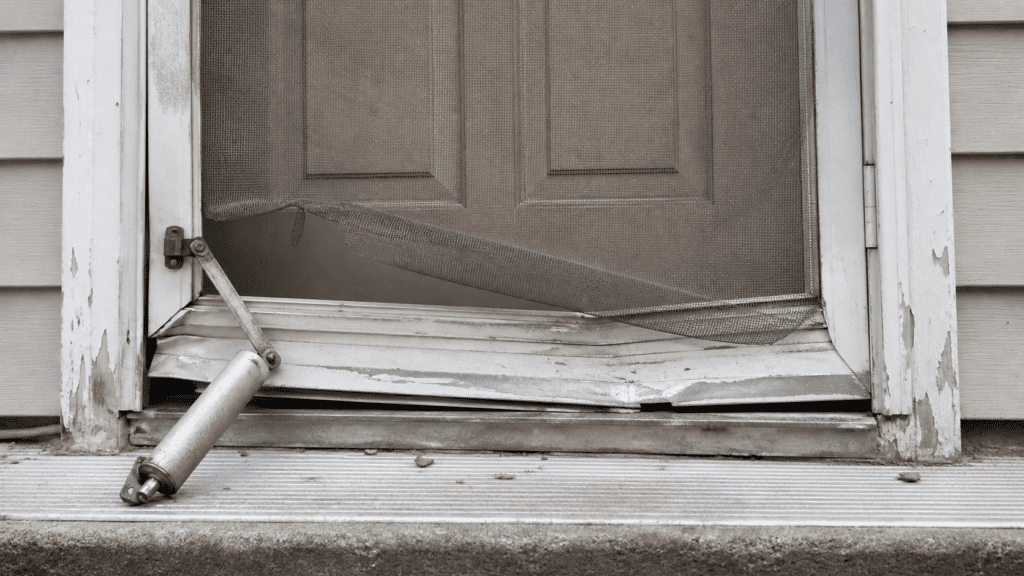
A brand-new install is well within DIY range, but a few situations are worth handing off. If the existing frame is rotted or badly out of square, the fix is carpentry before it is a door swap, and forcing a new storm door onto a bad opening just hides the problem for a season. The same goes for an oversized or custom opening that no stock door fits.
If your current storm door already hangs but will not latch, drags, or bangs in the wind, you may not need a new door at all. Those are usually closer, sweep, or alignment fixes, and our guide to repairing a storm door that will not close walks through the common adjustments.
Most storm-door complaints we see around Columbus turn out to be a worn closer or a strike plate that drifted out of alignment, not a door that has reached the end of its life.
Ready for a Hand With Your Door?
Whether you are adding a storm door or fighting one that will not seal, a quick look tells you whether it is a simple adjustment, a hardware swap, or a frame issue underneath. There is no sense replacing a whole door when a closer and a strike plate would have solved it.
Book a free, no-pressure window and door assessment from our Columbus-area team and get a straight answer on repair versus replacement.
FAQ: Installing a Storm Door

Ready to fix your windows? Get a free quote in 30 seconds.
Family-owned, licensed & insured. Most quotes delivered the same day.