Order a replacement window an inch too wide and it will not fit the opening. Order it a half-inch too small and you are left stuffing the gap with foam and trim. Measuring is the step that decides whether the new unit drops in clean or fights you the whole install, and it takes more care than most people expect because the opening is rarely a perfect rectangle.
This guide covers what to measure, the tools you need, the three-point width and height method the pros use, how to check the opening for square, and the depth and condition checks that tell you whether a simple insert will work. Getting the numbers right is the first half of a good window installation, so it pays to slow down here.
Quick answer: To measure a window for replacement, work from inside and measure the opening, not the old window. Measure the width at the top, middle, and bottom, the height at left, center, and right, and use the smallest reading each time. Check the diagonals for square, confirm the jamb depth, and round down.
Why Careful Measurement Decides the Whole Job
A replacement window is built to the numbers you send, and once it is cut, those numbers are locked. There is no trimming a vinyl or fiberglass frame down on site the way you might shave a door. If the unit comes in too big it goes back, and if it comes in too small you spend the day hiding the gap. Either way the measuring mistake costs more than the measuring ever would have.
The goal is not the largest window that could fit. It is a unit slightly smaller than the opening, with a consistent gap all the way around for shims. That gap is where you square the window, level it, and pack in insulation and an air seal. In an Ohio climate that swings from humid summers to freeze-thaw winters, that sealed shim space is what keeps drafts and meltwater out of the wall, so a window ordered to the exact opening leaves nowhere to do the part that matters.
This is why every reliable method ends with the same two rules: take several readings and use the smallest, then round down. You are sizing the window to the tightest point of an imperfect opening, on purpose.
What You Need Before You Start
None of this is specialized, but the right tools turn a guessing game into a repeatable measurement. A flimsy cloth tape sags and reads long, so a steel tape is the one tool worth being fussy about. A level matters more than people think, because it is how you catch an opening that has drifted out of square over the years.
Gather the short kit below before you climb the ladder or pull the screens, so you are not setting a tape down on a cold sill and losing your place.
- A steel tape measure at least sixteen feet long, for accurate, repeatable readings.
- A four-foot level to check the opening for plumb and square.
- A notepad and pen to record each opening on its own line, never from memory.
- A flashlight to see the jamb depth and spot rot or gaps in the corners.
- A phone camera to photograph each opening and any damage you find.
- A flat screwdriver to probe the sill and jambs for soft, rotted wood.
Measure the Opening, Not the Old Window
The single most common mistake is measuring the existing window or the interior trim instead of the opening itself. Trim is decorative, it varies by whoever installed it, and the old sash may already be the wrong size. Your new window has to fit the structural frame behind all of that, so that frame is what you measure.
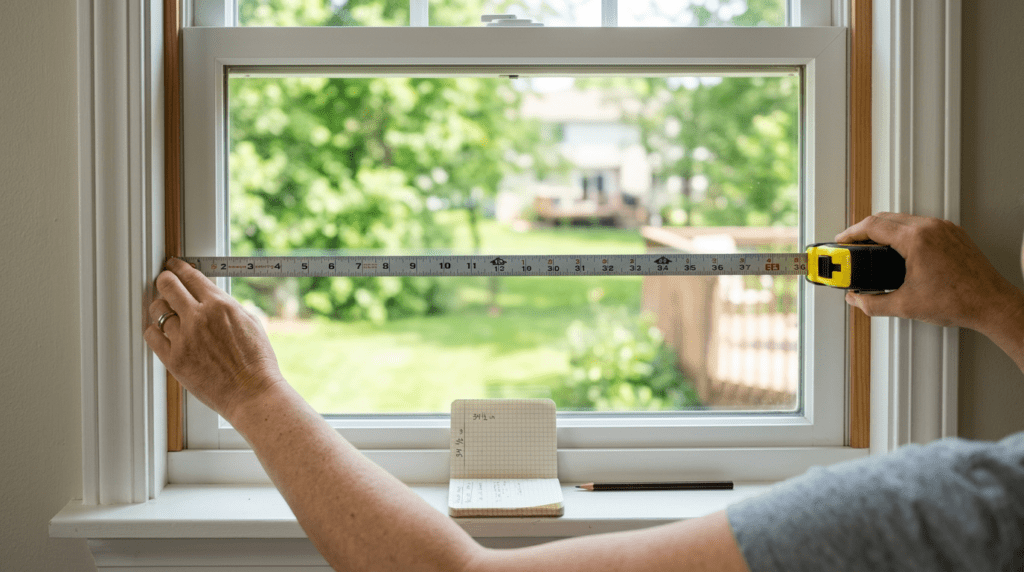
Work from inside the house and measure to the jamb, the flat vertical and horizontal surfaces that form the actual opening. It helps to know the names. The two sides are the side jambs, the top is the head jamb, and the bottom is the sill. You are measuring jamb to jamb for width and head jamb to sill for height, ignoring the casing and stops that sit proud of those surfaces.
If you are not sure where the jamb ends and the trim begins, pop off a piece of interior stop and look. A few minutes confirming what you are measuring against beats ordering six windows to the wrong reference line.
How to Measure a Window for Replacement, Step by Step
The order below is what keeps the job accurate: confirm your reference surfaces, check the opening for square, then take the width and height at three points each. Measure to the nearest eighth of an inch and write every number down as you go, because three openings start to blur together fast.
Take each reading twice. A tape that catches on a burr or sits at a slight angle can read an eighth long, and an eighth is enough to matter.
- Confirm what you are measuring. Work from inside, measuring to the bare jamb, not the trim or the old sash.
- Check the opening for square. Measure both diagonals corner to corner; if they differ by more than a quarter inch, the opening has shifted.
- Measure the width three times. Measure jamb to jamb near the top, across the middle, and near the bottom, then keep the smallest.
- Measure the height three times. Measure from the head jamb to the high point of the sill on the left, center, and right, and keep the smallest.
- Measure the jamb depth. Check the flat pocket between the interior stop and the exterior blind stop for clearance.
- Record and round down. Note each opening separately to the nearest eighth inch, then round down so the unit has room to shim.
Why You Measure Three Times and Use the Smallest
Taking three width and three height readings is not busywork. A century-old home in German Village or Clintonville has settled, and the opening that started as a clean rectangle in 1915 is now a little wider at the bottom than the top, or bowed in the middle. The three points catch that drift, and using the smallest guarantees the window clears the tightest spot.
The square check tells the same story from another angle. When the two diagonals are off by more than a quarter inch, the opening is closer to a parallelogram than a rectangle, and a square window dropped into it leaves a wedge-shaped gap on one side. A small difference you can shim and trim. A large one is a sign the framing has moved, and it changes what kind of replacement you should be ordering.
Rounding down ties it together. A window ordered to the exact smallest reading still needs the shim gap that lets you level it and seal it against Ohio winters. Round down to the eighth, never up, and let the gap do its job.
Checking Depth and the Things That Block It
Width and height get the attention, but depth is what quietly kills an insert replacement. An insert slides into the existing frame, so the frame has to be deep enough to hold it. Measure the flat, unobstructed pocket from the interior stop back to the exterior blind stop. As a rule of thumb you want roughly three and a quarter inches of clear depth for a standard insert.
The word that matters there is unobstructed. Plenty of openings have the depth on paper but lose it to something in the way. Watch for a window lock or crank that eats into the pocket, a deep stool that overhangs the track, pipes or wiring near a kitchen or bath window, and old storm-window hardware screwed into the jamb.
If the pocket is too shallow or too cluttered, an insert is the wrong product, and you are looking at a full-frame replacement instead. Better to learn that with a tape and a flashlight now than after the new unit shows up and will not seat.
Insert vs Full-Frame: What Your Measurements Tell You
Measuring is also an inspection. While you have the tape on the opening and a screwdriver in hand, you are learning whether the frame is sound enough to keep. An insert replacement reuses the existing frame and is faster and cleaner, but it only works if that frame is square, dry, and solid. A full-frame replacement tears the opening back to the studs and is the right call when it is not.
Press the screwdriver into the sill and the bottom corners of the jambs as you measure. If the wood is soft or spongy, water has been getting in, and an insert would just trap the rot behind a new window.
On older Columbus homes, the opening that measures out of square almost always has a soft corner to go with it. By the time the diagonals are off by half an inch, water has usually found the sill, and that is a full-frame job, not an insert.
If the probe finds rot, the fix starts with repairing the sill and frame before anything new goes in. And if the only real problem is a foggy, failed seal between the panes, you may not need a new window at all, just insulated glass replacement. The measurements, plus what you notice while taking them, point you to the right one.
Measuring Special Windows: Bay, Egress, and Basement
The three-point method covers most double-hung and slider openings, but a few situations need an extra step. A bay or bow window is several units joined at angles, so each section is measured on its own and the angles matter as much as the dimensions. This is one to hand to a pro to template rather than guess.
Basement and bedroom windows carry a code wrinkle that has nothing to do with fit. They have to provide a legal egress opening for escape and rescue, measured as the clear space you could actually climb through with the window open, not the frame size. A replacement insert shrinks that clear opening slightly, and on a window already close to the line, it can drop a bedroom below code.
The fix is to measure the clear opening before you order and choose a style that keeps it legal. A casement window that swings fully clear often nets more egress opening than a double-hung window of the same size, which is worth knowing before you commit.
Mistakes That Lead to a Wrong-Size Window
Most measuring errors trace back to a handful of habits, and every one of them is easy to avoid once you know to watch for it. Run through this list before you place the order, because a wrong number here is not something you can fix later with caulk.
The theme is simple: measure the opening, measure it more than once, and trust the smallest number.
- Measuring the old window or the trim instead of the structural jamb behind it.
- Taking a single width and height and assuming the opening is square.
- Rounding up to the nearest inch, which leaves no room to shim and seal.
- Reusing one size for several openings that look identical but have each settled differently.
- Ignoring the depth and ordering an insert that will not seat in a shallow frame.
- Skipping the rot check and sealing water damage behind a brand-new window.
Not Sure Your Numbers Are Right?
If the opening measures out of square, the sill feels soft, or you are second-guessing whether an insert or a full-frame replacement is the right call, it is worth a second set of eyes before you order. A wrong measurement is the one mistake on this job that cannot be fixed after the fact.
Book a free, no-pressure in-home measurement and quote with our Columbus-area team, and we will template every opening and recommend the right replacement approach for your home.
FAQ: Measuring Windows for Replacement

Ready to fix your windows? Get a free quote in 30 seconds.
Family-owned, licensed & insured. Free, no-obligation quotes.