What to Expect During Window Installation

Professional window replacement turns drafty, inefficient windows into sealed, energy-saving ones that boost home comfort. Over a decade-plus in window restoration here in Columbus, Ohio, hundreds of homeowners have been guided through this process. The window installation process unfolds as a structured day—or two—filled with precise work, minimal mess, and clear updates from certified professionals.
Window Replacement Timeline and Average Duration
The window replacement timeline depends on project scope, but most jobs wrap up in one to four hours per window for basic replacements. For a single window, count on two to three hours total, including removal and fitting. Multiple windows stretch that to a full day or more, as crews handle sequencing to keep the home livable. The duration of window installation varies based on factors like home layout and window count, with the window replacement timeline often aligning to homeowner schedules for minimal disruption. This approach considers various window types, such as double-hung or casement designs, which may require slight adjustments in handling to ensure proper alignment and functionality.
Factors Affecting Installation Time
Home age, window size, and access challenges influence duration. Older homes with custom frames add 30-60 minutes per window for careful siding protection. Custom ordering extends the overall timeline by 4-6 weeks upfront, while off-the-shelf units speed things up. Weather delays outdoor work by a day if rain hits, and material curing—like expanding foam—requires 24 hours before full testing. These elements shape the average time for basic window replacement, ensuring the project timeline stays predictable. Additional considerations, such as the choice between vinyl, wood, or fiberglass materials, can also impact efficiency, as denser frames might demand more precise cutting and fitting techniques during the process.
Typical Timeframes for Single vs. Multiple Windows
A single operable window takes 2-3 hours: 45 minutes for removal, 1 hour for fitting and sealing, and 30 minutes for checks. For 5-10 windows in a typical Ohio ranch home, plan 6-8 hours spread over one or two days. In a historic Victorian project handled last year, 12 windows needed two full days to preserve original trim, ensuring no rushed alignments. This breakdown highlights the standard steps in window installation for different scales. For larger projects involving bay or bow windows, timelines may extend further due to the need for reinforced support structures and additional sealing around curved elements.
Managing Disturbances and Minimizing Noise
Installation crews use barriers and phased work to limit noise and disruption, keeping daily routines intact. Power tools hum for short bursts during frame cuts, but schedules align around needs—mornings for families with kids, quieter methods for noise-sensitive neighbors. Managing disturbances from window installation involves strategies like timed operations, which help maintain a peaceful environment throughout the comprehensive window replacement process. Techniques such as using low-decibel saws and vibration-dampening pads further reduce auditory impacts, allowing homeowners to continue remote work or relaxation without significant interruptions.
Protecting Interior and Exterior Spaces
Drop cloths shield floors and furniture inside, while tarps cover landscaping outside to catch debris. In one Columbus townhouse job, rooms were taped off to contain dust, allowing the homeowner to work from home uninterrupted. Exterior siding stays intact with gentle prying tools, preventing chips that could cost extra repairs. These measures contribute to minimizing noise during window installation and protecting surrounding areas effectively. For homes with delicate interior finishes like hardwood floors or ornate plaster walls, extra layers of padding and plastic sheeting provide added safeguards against potential scuffs or settling dust particles.
Handling Dust, Debris, and Daily Life Disruptions
Vacuum attachments on tools capture 90% of dust at the source, and waste gets hauled mid-job to avoid piles. For daily life, pauses occur for pet walks or family meals, coordinating via quick check-ins. Post-installation cleanup tips include wiping sills immediately, as sealants dry fast and attract lint if left. Debris cleanup forms a key part of the installation procedure, ensuring the site returns to normal quickly. In multi-day installations, daily mid-afternoon waste removal keeps pathways clear, preventing any accumulation that could hinder mobility around the home during ongoing work.
Communication with the Installation Team
The team arrives on time with a quick walkthrough, then provides hourly updates via text or in-person chats to keep everyone informed. Transparency builds trust—anxious homeowners relax once they hear the plan. Effective communication supports the what to expect during window installation, making the entire experience more predictable. This ongoing dialogue also allows for adjustments based on real-time discoveries, such as unexpected frame irregularities, ensuring the final result meets expectations without surprises.
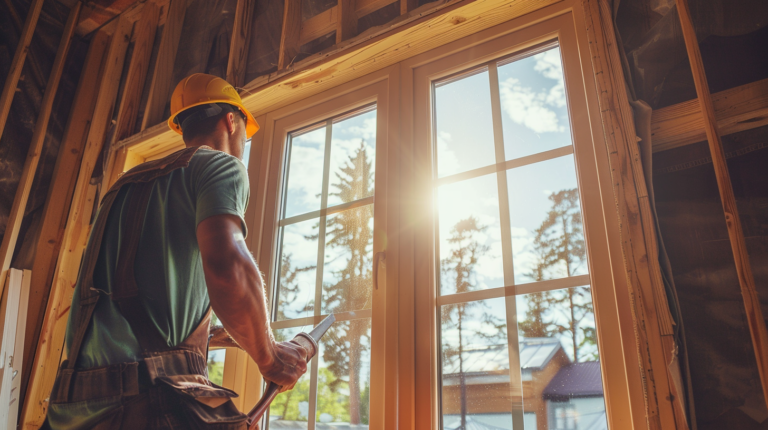
Arrival, Setup, and On-Site Updates
Crews pull up in marked vans by 8 AM, unload tools quietly, and set up in 15 minutes. Updates cover progress, like “Old window out—new one fitting now,” so the window installation process unfolds step-by-step. In a recent Cincinnati multi-window swap, real-time photos via app eased the client’s remote concerns. These on-site updates tie into the expert window installation guide for seamless coordination. Such visual confirmations help in verifying aspects like jamb alignment or seal placement, providing homeowners with tangible assurance of quality workmanship.
Addressing Concerns in Real-Time
Raise issues on the spot—stuck sash or alignment worry—and pause to explain or adjust. One client flagged a draft during fitting; a shim tweak fixed it before sealing. Responsiveness turns potential headaches into smooth finishes, enhancing the overall homeowner’s guide to window replacement. This immediate problem-solving approach extends to clarifying technical details, such as the role of weep holes in preventing moisture buildup, fostering greater understanding and satisfaction.
How to Prepare for Window Installation

Preparation cuts stress and speeds the job, turning a full-day project into an efficient upgrade. Sites from modern condos to 1920s bungalows have been prepped, with recommendations to start two weeks out with coordination and clearing. How to prepare for window installation involves practical actions that set the stage for success. These steps also encompass verifying local building permits if required for structural changes, ensuring compliance from the outset.
Essential Steps Before the Professionals Arrive
Measure openings precisely twice, clear paths to windows, and confirm delivery dates to avoid delays. Remove blinds or curtains to save time—the team handles the rest. Site preparation ensures smooth access, aligning with the fundamental steps of the installation procedure. Double-checking measurements against manufacturer specs prevents ordering errors, particularly for specialty shapes like arches or trapezoids that demand exact tolerances.
Scheduling Walk-Throughs and Contractor Coordination
Book a free estimate walk-through 4-6 weeks ahead, discussing pocket versus full-frame needs. Coordinate for exact arrival slots, factoring in Ohio’s variable weather. Synced schedules prevent 80% of rescheduling hassles, supporting the steps for professional window replacement. During these consultations, reviewing options like impact-resistant glass for storm-prone areas can tailor the project to regional climate demands effectively.
Clearing Access Areas and Removing Fixtures
Move furniture 3-5 feet from windows and tape valuables. Strip interior trim if it’s loose, but leave siding to pros—DIY attempts often lead to cracks. For a recent project, clearing a cluttered sunroom allowed seamless access, finishing 30 minutes early. Here are essential numbered steps for clearing access:
- Assess the work zone and identify movable items like furniture or plants.
- Relocate heavy pieces at least 3 feet away to create a safe perimeter.
- Remove window treatments such as curtains or blinds to expose the frames fully.
- Secure loose fixtures with tape or covers to prevent shifting during activity.
Expanding on step 4, using painter’s tape for lightweight items and heavy-duty plastic for larger objects adds an extra layer of security against accidental displacements.
Preparing Your Home and Family
Secure pets in a quiet room and pack away breakables near work zones to maintain calm. Delivery logistics involve staging new windows in the garage, covered to protect from elements. These preparations minimize disruption and align with anticipated outcomes of a hassle-free day. Informing neighbors in advance about potential brief noise periods can also smooth community relations during the exterior phases.
Safeguarding Pets, Children, and Valuables
Board pets or confine them during peak noise; for kids, set up play areas away from dust. Cover electronics with sheets—vibrations can shift items. One family used this setup, keeping their toddler safe while sliders were replaced. Bulleted tips for safeguarding include:
- Confine pets to a distant room with familiar bedding to reduce stress from unfamiliar sounds.
- Create child-friendly zones in unaffected areas, stocked with quiet activities like books or puzzles.
- Wrap valuables in protective sheets, focusing on items near vibration sources such as speakers or shelves.
- Label and relocate breakables to a central, secure spot for easy post-job return.
For households with elderly members, designating a quiet retreat space with essential amenities ensures comfort throughout the installation duration.
Window Delivery Logistics and Storage
New units arrive crated; store them upright in a dry spot to prevent frame warps. Handle unloading, but input on placement avoids blocking driveways. Custom energy-efficient windows need 48 hours acclimation to room temps for best fit, tying into precise measuring and custom ordering. Monitoring humidity levels during storage, ideally below 50%, further protects against warping in materials like wood or vinyl composites.
Choosing the Right Installation Method
Pocket replacement swaps the unit inside the existing frame for quicker jobs, while full-frame rebuilds the entire opening for better insulation. Assess based on rot or efficiency goals—pocket works for 70% of repair-focused clients. This choice influences the smooth operation of operable windows post-install. Considerations like the home’s overall energy audit can guide selecting methods that maximize U-factor improvements for better thermal performance.
Pocket vs. Full-Frame Replacement Overview
Pocket suits intact frames, taking half the time of full-frame, which removes everything for total refresh. Pocket costs 20-30% less but misses hidden rot fixes. Understanding these options forms part of the window fitting shimming techniques and overall precision. Full-frame methods, in particular, allow for the integration of advanced features like triple glazing, enhancing soundproofing in urban settings.
Assessing Your Home’s Needs for Optimal Fit
Inspect for frame damage or energy leaks; historic homes often need full-frame to preserve architecture. In an Ohio colonial restoration, full-frame alignment fixed sagging sills, improving operation by 50%. Frame alignment ensures long-term durability and aligns with sash replacement needs. Evaluating moisture intrusion patterns through simple tests like the candle-flame method can reveal underlying issues that dictate the best approach.
Step-by-Step Window Installation Process

The comprehensive window replacement process follows standard steps: remove old, fit new, seal tight, and test thoroughly. Full-time technicians ensure each phase aligns with building codes for lasting results. This expert window installation guide outlines the key phases for clarity. Adherence to protocols like those from the American Architectural Manufacturers Association (AAMA) guarantees compliance and reliability across installations.
Safely Removing Old Windows
Removal starts from inside for safety, using pry bars and scores to detach without wall gouges. Expect 20-40 minutes per window, with debris bagged immediately. Removing old windows safely prevents structural issues and sets up precise fitting. Proper disposal of old units, including recycling aluminum or glass components, aligns with eco-friendly practices in modern renovations.
Inside vs. Outside Removal Techniques
Inside approach works for upper floors, avoiding ladder risks; outside suits ground-level for faster siding access. Blend both—inside for sashes, outside for frames in multi-story jobs—to minimize exposure. Old window removal techniques vary by home design for efficiency. For homes with brick veneer, outside techniques often incorporate specialized chisels to avoid mortar damage during the extraction.
Avoiding Damage to Walls, Trim, and Siding
Score paint lines first to prevent tears, and brace walls with shims. In a 1950s ranch replacement, careful exterior cuts preserved aluminum siding, saving $500 in fixes. Trim installation follows to restore aesthetics seamlessly. Using heat guns for adhered trim in older homes facilitates removal without splintering, maintaining the architectural character intact.
Window Fitting and Shimming Techniques
Shimming levels the frame with composite wedges, ensuring plumb alignment within 1/16 inch for smooth operation. Precise measuring upfront guarantees no gaps. The shimming process secures fastening and supports functionality testing. Composite shims, made from plastic or wood composites, resist compression better than traditional wood, providing stable support over years.
Measuring and Customizing for Precision
Record rough opening dimensions, subtracting 1/4 inch for play; custom order if over 48 inches. Laser levels confirm fits during install—a step that caught a warped frame in an early job. Precise fitting integrates with secure fastening for stability. For oversized units, incorporating temporary bracing during fitting prevents sagging until permanent anchors are set.
Ensuring Structural Integrity and Alignment
Fasten with screws through jambs into studs, then shim to distribute weight evenly. This prevents settling, common in Ohio’s clay soils. Frame alignment ensures the windows operate without binds over time. Torque specifications for screws, typically 80-100 inch-pounds, ensure secure holds without stripping the surrounding wood.
Installing Energy-Efficient Windows
Benefits of Energy-Saving Features
Double-pane units block UV by 70%, preserving furnishings while maintaining views. In Columbus winters, they reduce condensation, a fog-up culprit fixed countless times. Insulation materials like argon gas provide clear, lasting performance. Low-emissivity (low-E) films reflect infrared heat back indoors, contributing to consistent indoor temperatures year-round.
Integration with Home Insulation Systems
Pair with spray foam in walls for R-value boosts; test drafts post-install to confirm seals. A recent upgrade dropped energy use by 20%. This ties into insulating window frames effectively for comprehensive efficiency. Coordinating with existing HVAC systems ensures that window upgrades complement overall home envelope performance, avoiding imbalances in airflow.
Proper Sealing and Insulating Window Frames
Caulking with silicone and backer rod creates airtight barriers, followed by expanding foam for insulation. Allow 24-hour cure before painting. Proper sealing of new windows uses caulking techniques and weather sealing for durability. Backer rod placement at a depth of about 1/2 inch optimizes the caulk bead’s flexibility against expansion and contraction.
Materials and Methods for Weatherproofing
Apply flashing application over sills first, then low-expansion foam to fill voids without bowing frames. Silicone beads seal edges, resisting Ohio’s freeze-thaw cycles. Flashing application and expanding foam ensure robust protection. Self-adhering flashing tapes, resistant to water and UV, provide an additional barrier against infiltration in high-moisture areas.
Testing for Airtightness and Functionality
Use smoke pencils for leak detection and operate sashes 10 times to check balances. Functionality testing ensures no binds, as in a project where balances were adjusted on-site. Curing time for sealants confirms reliable performance. Blower door tests, if conducted professionally, quantify overall airtightness, targeting less than 0.35 air changes per hour for optimal efficiency.
Post-Installation Cleanup and Care

Cleanup restores space within an hour, with inspections confirming smooth operation and clean seals. Long-term, simple habits extend window life by years. Caring for new windows after installation involves routine checks to maintain value. Documenting the installation with photos aids in future warranty claims or maintenance planning.
Immediate Aftermath and Inspection
Walk through with the crew to verify alignment, seals, and no cracks—sign off once satisfied. This phase includes quality assurance for all aspects. Noting any initial observations, like minor adhesive residues, allows for prompt resolution before final departure.
Professional Cleanup Standards
Sweep, vacuum, and haul all debris, leaving surfaces spotless. Waste hauling includes recycling glass, per Ohio regs. Debris cleanup restores order efficiently. HEPA-filtered vacuums ensure that fine particles are fully captured, preventing respiratory irritants from lingering in the air.
Quality Checks for Functionality and Aesthetics
Test locks, screens, and tilt features; check for level frames. Aesthetics shine with matched trim installation, blending new with old. Project timeline concludes with these verifications. Verifying screen tension and latch engagement ensures usability, while color-matching trim preserves the home’s visual harmony.
Long-Term Maintenance Tips
Wipe frames monthly with mild soap, lubricate hardware yearly, and inspect seals seasonally to prevent fogging or drafts. These practices support minimal disruption in daily use. Scheduling annual professional inspections can catch subtle wear, extending the lifespan of components like weatherstripping.
Cleaning, Lubricating, and Seasonal Care
Avoid abrasives on glass; oil tracks in spring. In humid Ohio summers, ventilate to curb moisture buildup. Seasonal care preserves the smooth operation of operable windows. Microfiber cloths for glass cleaning minimize streaks, and silicone-based lubricants prevent corrosion in metal hardware exposed to elements.
Troubleshooting Common Post-Install Issues
Sticky sashes? Adjust balances. Minor leaks? Recaulk promptly. Most issues arise from settling—address within 30 days for warranty coverage. Troubleshooting ensures lasting results. For issues like uneven settling, monitoring with levels over the first few months helps in early intervention.
Expert Tips for a Smooth Window Replacement
Delays from measurements hit 10% of jobs—double-check yours.
Avoiding Common Challenges
Wall damage? Use protective flashing. For upgrades, add solar films during install for extra efficiency. DIY homeowners should weigh risks against benefits. Common oversights like ignoring eave overhangs can affect shading and efficiency, so incorporating them into planning avoids later adjustments.
Managing Delays, Wall Damage, and Unexpected Issues
Buffer a half-day for surprises like hidden rot. Teams carry spares, minimizing downtime. This approach handles unexpected issues in the installation procedure. Carrying diagnostic tools, such as moisture meters, allows on-site identification of rot, enabling swift decisions without halting progress.
Energy Efficiency Upgrades During Installation
Incorporate insulated frames and smart vents; bills drop $200 yearly post-upgrade. Upgrades align with insulating window frames effectively and energy-saving goals. Smart glass technologies, which tint automatically, can further optimize daylight and heat control when integrated during the fitting phase.
Building Trust in the Process
Professional installation demonstrates expertise through precise work and warranties, fostering trust with consistent results. It preserves home value, blending repair philosophy with necessary replacements for both residential and historic needs. Warranties typically covering 10-20 years on glass and 5 years on labor provide peace of mind against defects.
Why Professional Installation Enhances E-E-A-T
Experience ensures code compliance; authority from ratings; trust via transparent quotes. Skip DIY for structural windows—safety first. This builds confidence in the process. High E-E-A-T (Experience, Expertise, Authoritativeness, Trustworthiness) is reflected in adherence to standards like ENERGY STAR certifications, assuring homeowners of vetted quality.
Frequently Asked Questions About Window Installation

Ready to fix your windows? Get a free quote in 30 seconds.
Family-owned, licensed & insured. Most quotes delivered the same day.