A storm door closer is the small cylinder that pulls the door shut behind you, and it is the part that fails first on most storm doors. When it is missing, worn out, or set wrong, the door bangs in the wind, drifts open in the cold, or never quite latches. Replacing or adjusting one is a thirty-minute job with a screwdriver and a drill, and it is the same hardware whether you are fixing an old unit or finishing a new storm door install.
This guide covers how the closer works, the exact install sequence, how to dial in the closing speed, and the Ohio-specific setup that keeps a spring windstorm from tearing the door off its hinges. The adjustments matter as much as the mounting, so do not stop once it is screwed on.
Quick answer: To install a storm door closer, screw the jamb bracket to the hinge-side jamb, clip the closer into it, attach the door bracket, then set the hold-open washer. Adjust the closing speed with the screw at the cylinder’s tip: clockwise slows the door, counterclockwise speeds it up. Add a second closer and a wind chain for Ohio gusts.
How a Storm Door Closer Works
Most storm door closers are pneumatic, which means a piston inside a sealed tube moves against trapped air to control how fast the door swings. When you open the door, air is pushed through a tiny port; when you let go, that air resists the spring and eases the door shut instead of letting it slam. A single screw at the end of the tube widens or narrows that air port, which is the entire secret to a door that closes the way you want.
A few storm doors use a hydraulic closer that works on oil instead of air, and these run quieter and last longer but cost more and are harder to find as a replacement. Either way the parts are the same: the cylinder, a jamb bracket, a door bracket, a connecting pin at each end, and the small hold-open washer that rides on the shaft. Before you buy, it helps to know which type of storm door you have, since full-view and retractable-screen models sometimes need a low-profile closer.
Knowing the piston is air-driven also explains why the same door behaves differently across the year. Cold thickens the response and warmth loosens it, so the setting that felt perfect in July will let the door slam by January. That is why this is a job you revisit, not a one-time install.
What You Need Before You Start
The closer kit usually ships with both brackets, two pins, and the hold-open washer, so check the box before you buy anything extra. What the kit does not include is the handful of common tools that make the install square and quick, and a crooked bracket is the most frequent reason a fresh closer drags or pops loose.
Gather everything below first so you are not holding the door with one hand and hunting for a drill bit with the other. If your door did not come with a safety chain, add one to the list now rather than after the next gust bends the frame.
- A cordless drill and small bit for clean pilot holes in the jamb and door.
- A flathead screwdriver for the mounting screws and the cylinder’s adjustment screw.
- A pencil and tape measure to mark bracket height evenly.
- A new pneumatic closer kit matched to your door’s width and weight rating.
- A wind chain or gust strap to stop the door from over-swinging in Ohio storms.
How to Install a Storm Door Closer, Step by Step
The order here keeps the closer level, which is what lets it pull evenly without binding. Mount the jamb side first, connect the cylinder, and only then mark the door bracket, because the closed-door position is the one that has to be right. Work with the door shut for the bracket marks and open it gently to test.
If you are setting this up as part of a brand-new door, our full storm door installation guide covers hanging the slab and squaring the frame first, then this closer step finishes the job.
- Position the jamb bracket. Hold it against the hinge-side jamb, centered on the door stop and set back about a quarter inch from the front edge, a few inches down from the top corner.
- Mark and drill pilot holes. Mark the screw holes, then drill small pilots so the screws bite without splitting the wood.
- Mount the jamb bracket. Screw it tight and flat against the stop, square to the jamb.
- Connect the closer. Slide the rod end into the jamb bracket, line up the holes, and drop the connecting pin through.
- Attach the door bracket. With the door closed, hold the closer level, mark the door bracket, drill pilots, screw it down, and pin the closer to it.
- Set the hold-open washer. Slide it along the shaft so it sits just past the lugs.
- Test and fine-tune. Open and release the door, then adjust the speed screw until it shuts firmly without banging.
Setting the Closing Speed
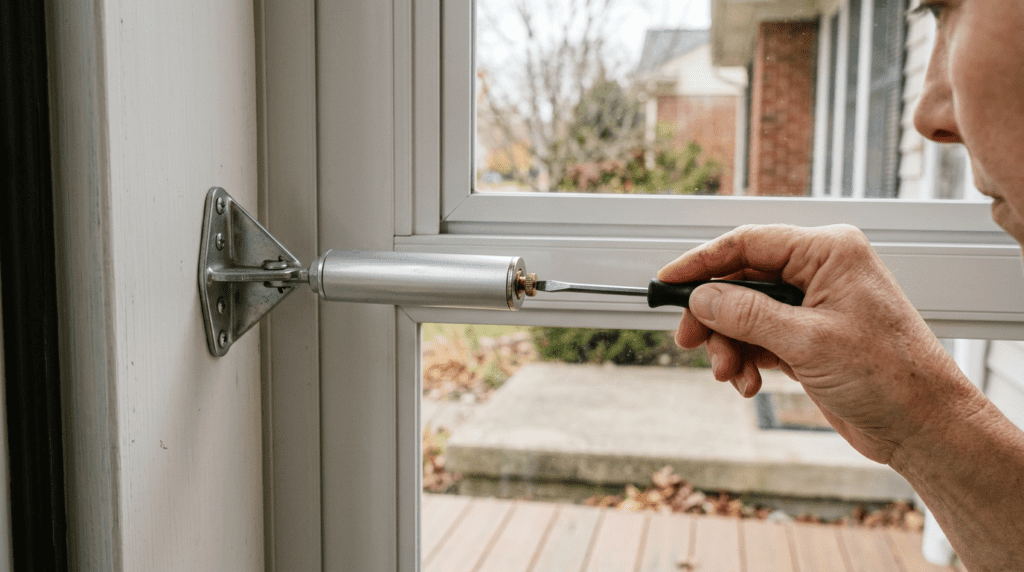
The adjustment screw lives at the very tip of the cylinder, on the door end, and a flathead is all you need to change everything about how the door behaves. Turn it clockwise to slow the door down and counterclockwise to let it close faster. Make small quarter-turns and test after each one, because a tiny change at the screw is a big change at the door.
Many closers also give you two mounting holes on the cylinder where the connecting pin can sit, and this is a second, coarser speed control that people overlook. Putting the pin in the rear hole, farther from the door, eases the door gently as it nears the frame, which suits a light screen panel in summer. Moving it to the front hole, closer to the door, adds force in the last few inches so a heavy glass panel pulls fully shut and latches in winter.
Aim for a door that closes on its own, latches without help, and does not slam hard enough to rattle the glass. If you cannot get a clean latch no matter how you set the screw, the problem is usually the strike alignment, not the closer, and checking your door and frame fit is the faster fix than fighting the cylinder.
Using the Hold-Open Washer Wisely
The hold-open washer is the little plastic or metal ring that slides on the closer shaft. Push the door fully open and nudge the washer up against the cylinder, and it catches there to prop the door for carrying groceries or moving furniture. Slide it back down toward the door and the hold-open feature switches off, so the door always returns on its own.
That convenience turns into damage fast on a breezy day. A propped storm door is a sail, and a sudden gust can swing it past its stop and bend the closer, the hinges, or the frame. Use the hold-open only when you are actively in and out, and release it the moment you are done.
On service calls around Columbus, the storm doors that come in with a bent closer arm were almost always left propped open on a windy afternoon. The hardware did its job; the wind simply won the argument.
Why Ohio Storm Doors Need Two Closers
One closer mounted at the top is the factory default, and it is enough on a calm day. Ohio rarely gives you a calm day in March. Spring and fall storms drive gusts straight at the front of a house, and a tall storm door catching that wind puts enormous leverage on a single closer and the screws holding it. The result is a sprung door that no longer latches, or a closer torn clean off the jamb.
Adding a second closer at the bottom of the door splits that load across two points and braces the door against twisting, which is the single best upgrade for wind country. The two should be set to the same speed so they pull together rather than fighting each other. It is the same hardware, simply mounted low instead of high, and it doubles the door’s resistance to a gust.
A safety wind chain is the other half of the defense. Mounted between the door and the jamb, it physically stops the door from swinging past the point where damage happens, even if a closer lets go. For an exposed front entry, both a bottom closer and a chain are cheap insurance against a much costlier door repair or a bent frame.
Adjusting the Closer for Each Season
A pneumatic closer reacts to temperature because it works on air, so the same setting that felt right in summer will misbehave once the weather turns. In an Ohio cold snap the trapped air contracts and the seals stiffen, which makes the door close slower and sometimes stall short of the latch. People assume the closer has failed when it simply needs a turn of the screw.
The fix is a seasonal habit, not a repair. Heading into winter, with the glass panel installed, turn the adjustment screw counterclockwise a little to restore a firm, complete close, and move the connecting pin to the front cylinder hole if the heavy glass needs more pull. In spring, when you swap to the screen, reverse both: ease the speed back and shift the pin to the rear hole so the lighter panel does not slam.
Two quick adjustments a year keep the door latching reliably and stop the slamming that loosens screws and cracks glass over time. It takes longer to find the screwdriver than to make the change.
Common Problems and Quick Fixes
Most closer complaints trace back to a setting or an alignment, not a broken part, so run through these before you buy a replacement. Each one is a two-minute check that saves a trip to the store, and several are the exact issues our technicians fix on the first visit.
If the door still misbehaves after every adjustment, the cylinder has likely lost its air seal and needs swapping, which is the same simple install you just did.
- Door slams shut: turn the adjustment screw clockwise in small steps to slow it down.
- Door will not close fully: turn the screw counterclockwise, or move the pin to the front cylinder hole for more pull.
- Door drifts open: check that the hold-open washer is slid down and not catching the lugs.
- Door catches the wind: add a bottom closer and a safety chain before the next storm.
- Will not latch no matter what: the strike is misaligned, not the closer; adjust the strike plate.
Door Still Slamming or Sagging?
If your storm door bangs, sticks, or refuses to latch after you have set the closer every way it goes, the trouble is often a sprung frame, worn hinges, or a door that was never square to begin with, and a closer cannot fix any of those. There is no sense wrestling a door every time the wind picks up.
Book a free, no-pressure assessment with our Columbus-area team and get a straight answer on whether it is a quick hardware swap or a frame that needs attention.
FAQ: Storm Door Closers

Ready to fix your windows? Get a free quote in 30 seconds.
Family-owned, licensed & insured. Free, no-obligation quotes.